If the image is big in dimension (length and breadth), reduce it to fit your webpage properly using the given options.
At the very bottom of the small window, under ticked ‘Resample Image’, click on the drop-down option and select ‘Bicubic Sharper (best for reduction)’.
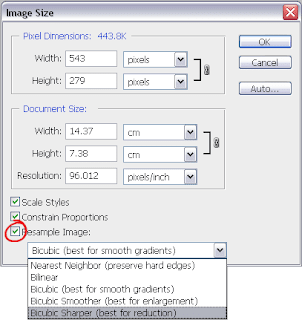
That’s it. Save image as, and upload it to the website.
Here’s a video how to do that:
Note: There isn’t any hard rule as to what’s the ideal size of an image to upload. But generally, to get the faster loading time, try to keep it under 30KB.
Steps To Reduce Image Size Smaller
1) Download images from top stock photo websites. Their images are optimized well pre-hand. My favorite is Pixabay. Pikwizard is another good website with a large and exclusive collection.
2) Resize that image to an ideal size that fits your webpage/blog post. For instance, if the end-to-end fit of your page is 800 x 350, resize your image to this exact dimension.
Resizeimage.net is a good image size adjuster. Resize and download.

In case if your original image isn’t of the aspect ratio of 800 x 350, resizing it will make it look bad, like this…

It this case, it’s best to crop the image first. There are countless tools to do this. Use cropping option of inbuilt Image Viewer on your desktop or Phone.
3) Use Tiny JPG/PNG to compress its size. Download and check its size. Is it less than 30KB? If yes, good enough. Upload it. If not, go to the next step.
4) Go to Compress JPEG or Compress PNG depending on the image format. Upload the optimized image that you downloaded from Tiny JPG, and minimize again here. Now download this 2x compressed image. Is it under 30KB? If yes, upload it. If no…
5) Repeat step 3 and 4 again to bring the image size under our limit. Once done, download and upload.
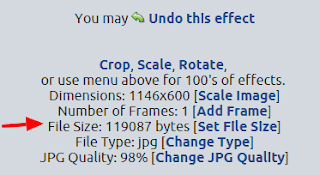
Alternatively, instead of using the above image size reducer, you can use Luna Pic Editor. Here you upload the image from desktop and specify the exact file size you want it to be reduced to.
Additionally, if you want to add texts and other elements in the picture, do it with Canva. Their final PNG download is usually well compressed.
Once edited and downloaded, use the aforementioned tools to compress the edited image.
Remember, if the image file is really big, it’s going to be difficult to bring it under 30KB without completely screwing its quality.
So, it’s always advisable to use images that are small in size. No HD, please.
Few Quick Tips To Reduce Image Size
• Don’t edit the original image; like increasing brightness and contrast. It increases its size.
• Don’t put text over the image (unless necessary). It increases its size.
• If you do want text, don’t choose any image for the background. Keep the text over a solid background. (Like the first image in this post. It’s just 4.75KB)
• Avoid adjusting the image’s dimension in the post using CSS or HTML directives. Use the image in its original length and breadth.
• Avoid making your website image-centric. Don’t use images unnecessarily.
• JPG/JPEG and PNG are your go-to image format.
• Expect the image to look blurry and, at times, fucked up. Unless the image is supposed to be closely looked and read (like graphs), don’t over-stress. It’s likely they would look decent on mobile devices.
Now, go to Google’s PageSpeed Insights and analyze your homepage and other URLs to see if images are slowing down the loading speed. If yes, compress them correct.
